
Note: This website works best in a browser which fully
supports HTML5. I advise Firefox or Chrome. In Internet Explorer and EDGE the
collapsed menu will not work! (All the information is visible
though)
If you have any questions you can reach Nemesis Abre-Kai through ingame mail.
The corporation advises using the planets in the C1 Wormhole for a static PI income of 230m a week using 5 planets.
For ease of use and a good monthly income the corp has setup a recommended setup with 5 planets being:
There 2 different setups involved, 4 planets are setup to produce P2 products and 1 planet is setup to create P4 products. The P2 products will need to be ferried to the P4 planet every few days. The required skills are as follows, it takes less then 30 days to train these from scratch:
The initial setup cost is [TODO]m ISK which means you earn back you investment in [TODO] days.
P2 planets
To setup a P2 planet there are a number of steps we need to perform (By pressing on a step you can hide/unhide the content):
Congratulations your P2 planets are done and producing. They will fill up every 4 days. [TODO] Add how to stertch this
P4 Planet
Note: To fully utilise this factory planet you need 2.5 times the P2 planets setup.
To setup a P4 planet there are a number of steps we need to perform:
Congratulations your P4 planets is done and producing. Supply it with P2 products it will fill up around 4 days. [TODO] Add how to stertch this
Note2: When using Firefox and Chrome you can unhide the content by pushing on the title. Press this for instance.
If you have any questions you can reach Nemesis Abre-Kai through ingame mail.
The corporation advises using the planets in the C1 Wormhole for a static PI income of 230m a week using 5 planets.
For ease of use and a good monthly income the corp has setup a recommended setup with 5 planets being:
- Gas, Produces: Synthetic Oil [P2]
- Oceanic, Produces: Fertilizer [P2]
- Storm, Superconductors [P2]
- Temperate, Polytextiles [P2]
- Barren, Produces: Nano-Factories [P4]
There 2 different setups involved, 4 planets are setup to produce P2 products and 1 planet is setup to create P4 products. The P2 products will need to be ferried to the P4 planet every few days. The required skills are as follows, it takes less then 30 days to train these from scratch:
- Remote planet sensing, lvl1
- Planetary Consolidation, lvl4 (Lvl3 is possible however the yields will be lower and you need to leave out 4 Advanced Factories)
- Planetary Interaction, lvl5
The initial setup cost is [TODO]m ISK which means you earn back you investment in [TODO] days.
P2 planets
To setup a P2 planet there are a number of steps we need to perform (By pressing on a step you can hide/unhide the content):
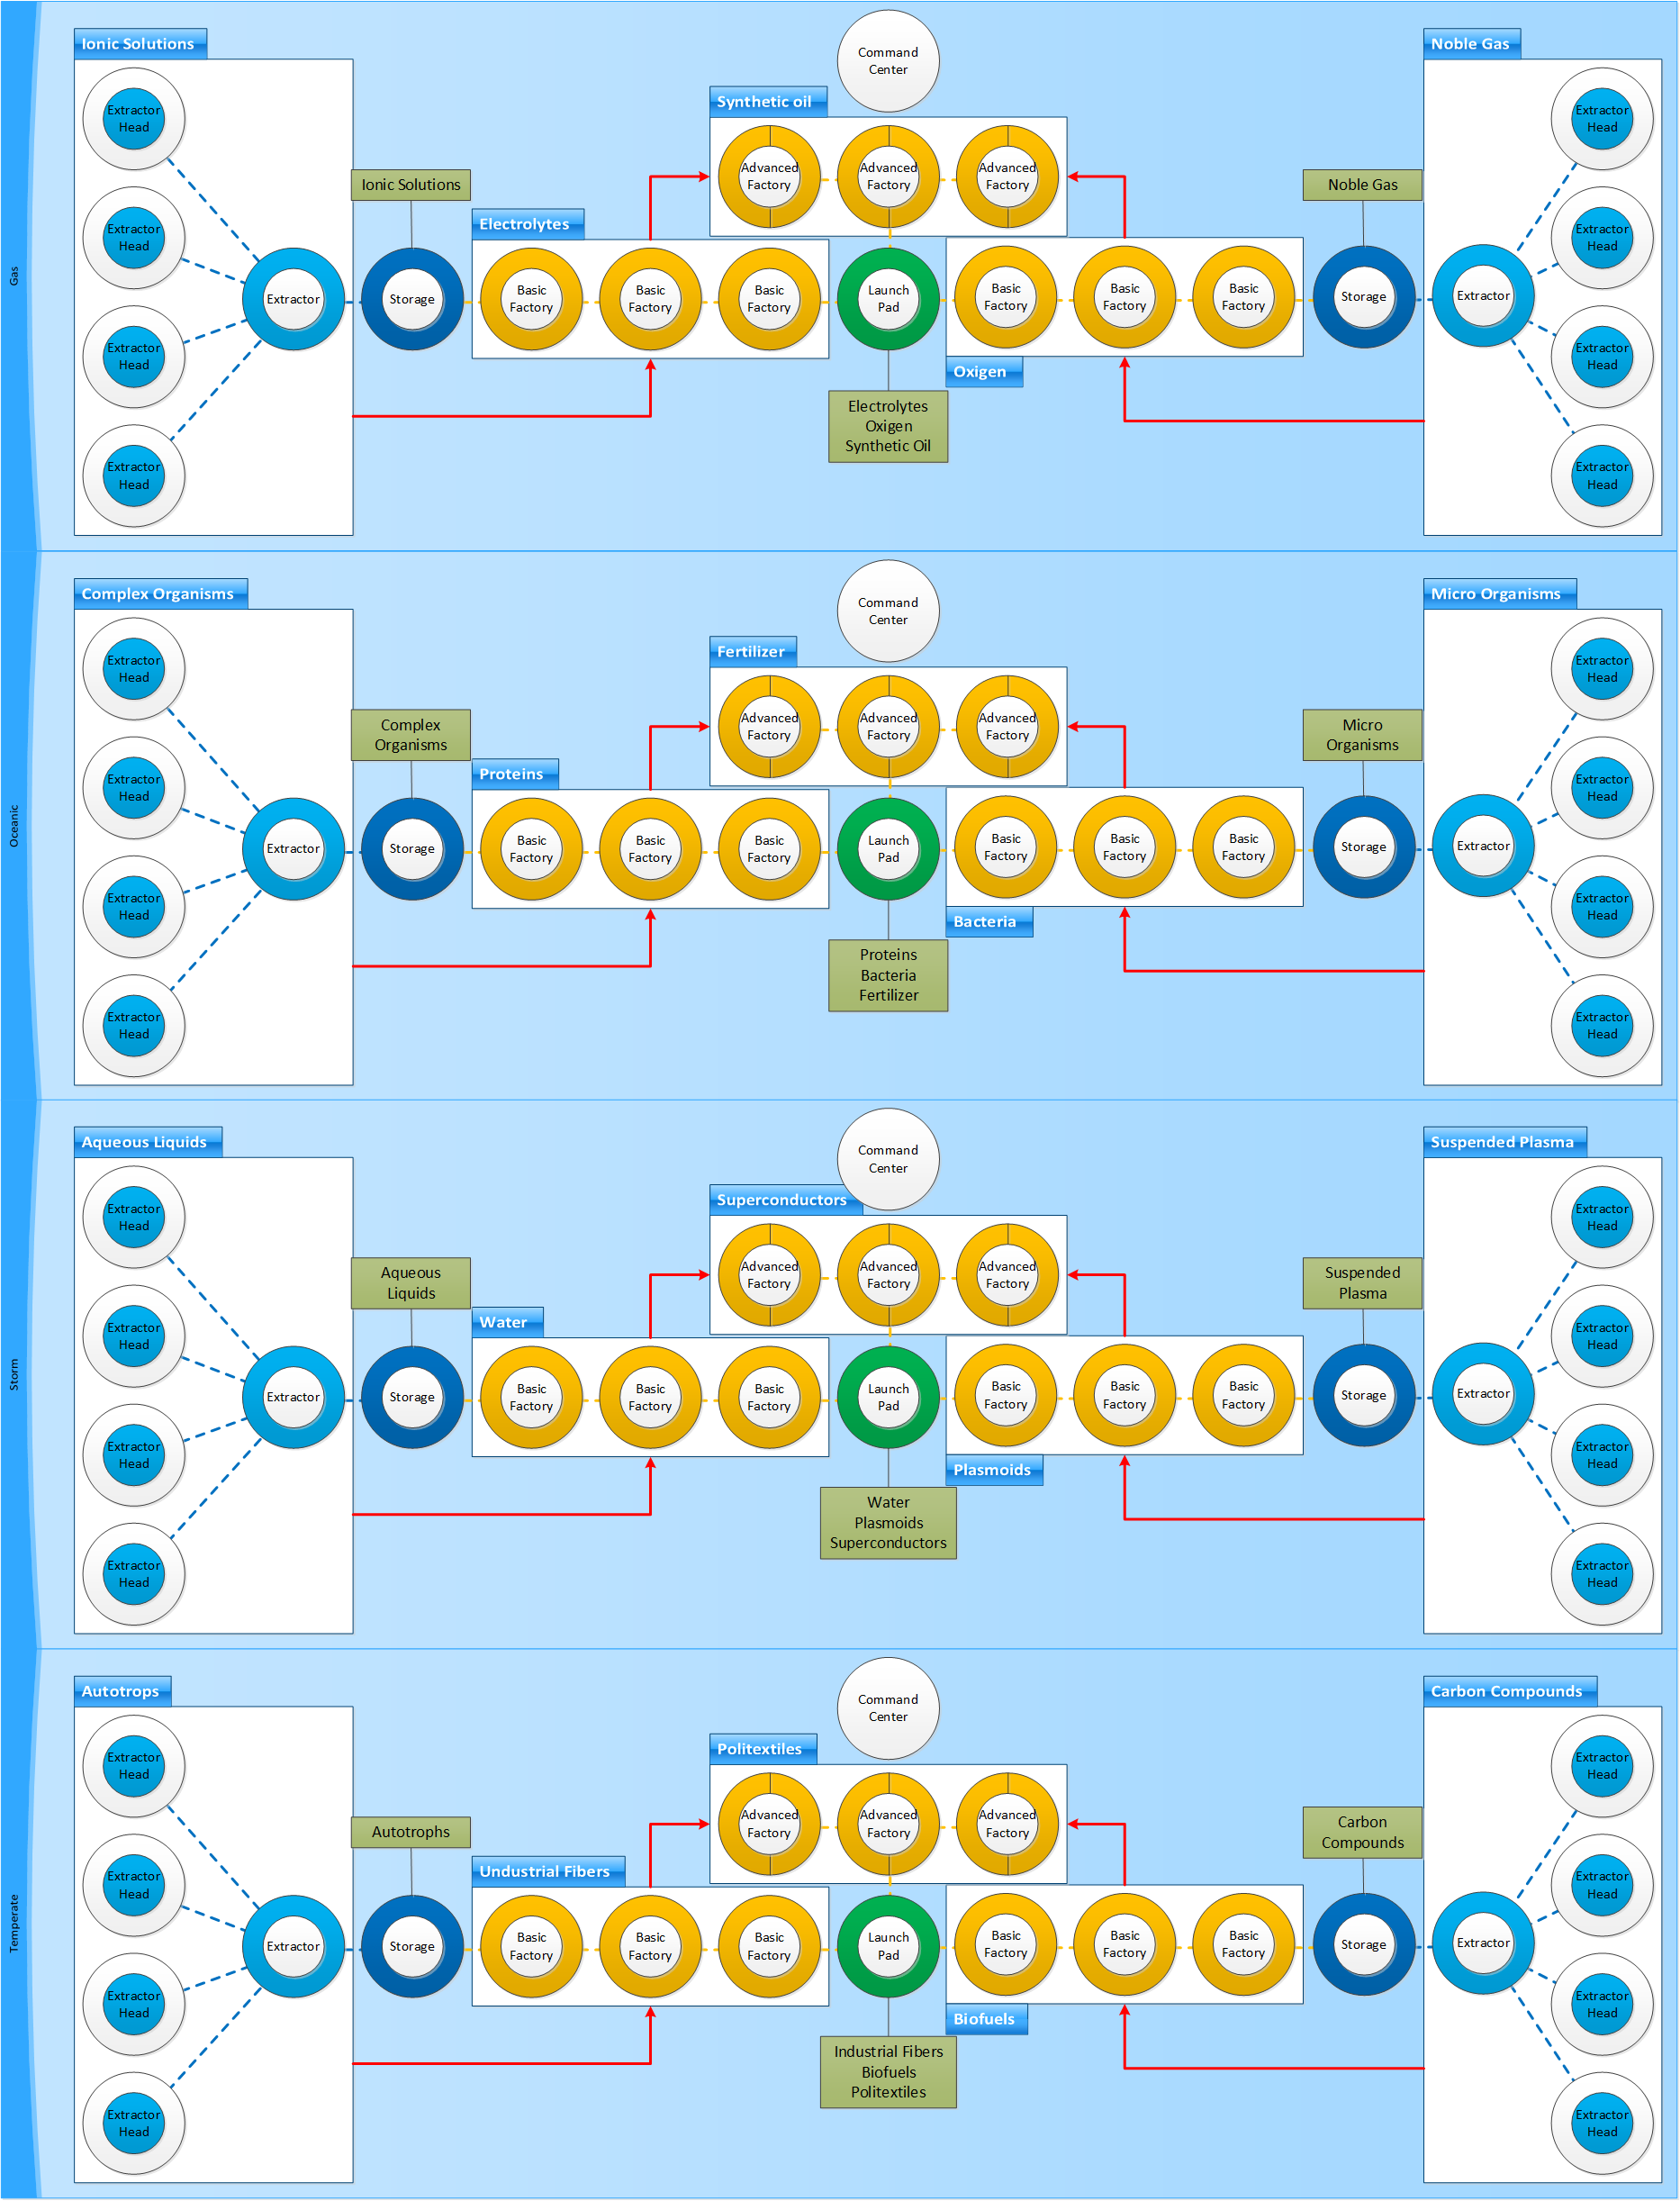
Setup table
The following table specifies the extractor and factory configurations for your planets producing P2 products.
Planet
TypeExtractor
-->(buffer)-->Basic Factory*3
-->(LP)-->Advanced Factory*3
Result (LP)Basic Factory*3
<--(LP)<--Extractor
<--(buffer)<--Gas Ionic Solutions Electrolytes Synthetic Oil Oxygen Noble Gas Oceanic Complex Organisms Proteins Fertilizer Bacteria Micro Organisms Storm Aqueous Liquids Water Superconductors Plasmoids Suspended Plasma Temperate Autotrophs Industrial Fibers Politextiles Biofuels Carbon Compounds The advised way of setting up your P2 planets
As you can see in the below image it is a good idea to setup your installations in a line this way you keep the connections short and still reach two places which are quite far apart. Keep in mind that the longer the connection the more power and CPU it uses. I personally try to set it up logically as well. In some cases it is a good idea to add the advanced factories to the line. No connections to the command center are required!
Note: Push the image to open it in a new browser tab/page.
Select the best location on the planet, the highest concentration of the two base resources you need close enough together that you can use the setup described in step 1
Press the scan button in planet mode and you will see the five resources that planet offers. Identify which resources you need in the table in "1. Setup table" and click that resource. Once done you get an overlay showing the availability of the resource on the planet. Adjust the bar with colors till there are only small white dots left.
[TODO]Write more on to find to find sweet spot explaining the process using the screenshot.
After placing the Command Center do not forget to upgrade it and press submit before continuing.Setup your two extractors each with their own extraction buffer
As seen in the PI overview (Select the best location on the planet) each extractor ideally has 4 extractor heads and a storage buffer. However this greatly depends on the richness of the resource deposit you found. Try to find the best balance it might be necessary to switch one extractor head between the two extractors for optimal production.
Note: After placing the two extractors you need to submit before you can add the extractor heads.
Now place the two extractors and make sure the range circle includes the specified resources sweet spot(s). Setup the extraction heads keeping the following in mind:- Extraction heads should not overlap
- Find the spot with the most resources
- I set the extraction window too 2 days and reset them each day
Route the extracted product to the extractors storage buffer.Place your three Basic factories per extraction buffer, making a total of six basic factories, launch pad and three Advanced factories
Now add the six basic factories. The reason I choose the setup in (2. The advised way of setting up your P2 planets) is so the connections will not get overloaded and no upgrading is needed.Setup your six Basic factories
Install 3 basic factories with each of the P1 products to produce. Route the output to the launchpad. Route the input from the extractor buffer to the basic factory.Setup your three advanced factories
Install the P2 product into the three advanced factories and route the result to the launchpad. Route the input products from the launch pad to the advance factories.
Do not forget to submit!
Congratulations your P2 planets are done and producing. They will fill up every 4 days. [TODO] Add how to stertch this
P4 Planet
Note: To fully utilise this factory planet you need 2.5 times the P2 planets setup.
To setup a P4 planet there are a number of steps we need to perform:
The advised way of setting up your P2 planets
This is just an example. The setup doesn't really matter much as long as the connections are short.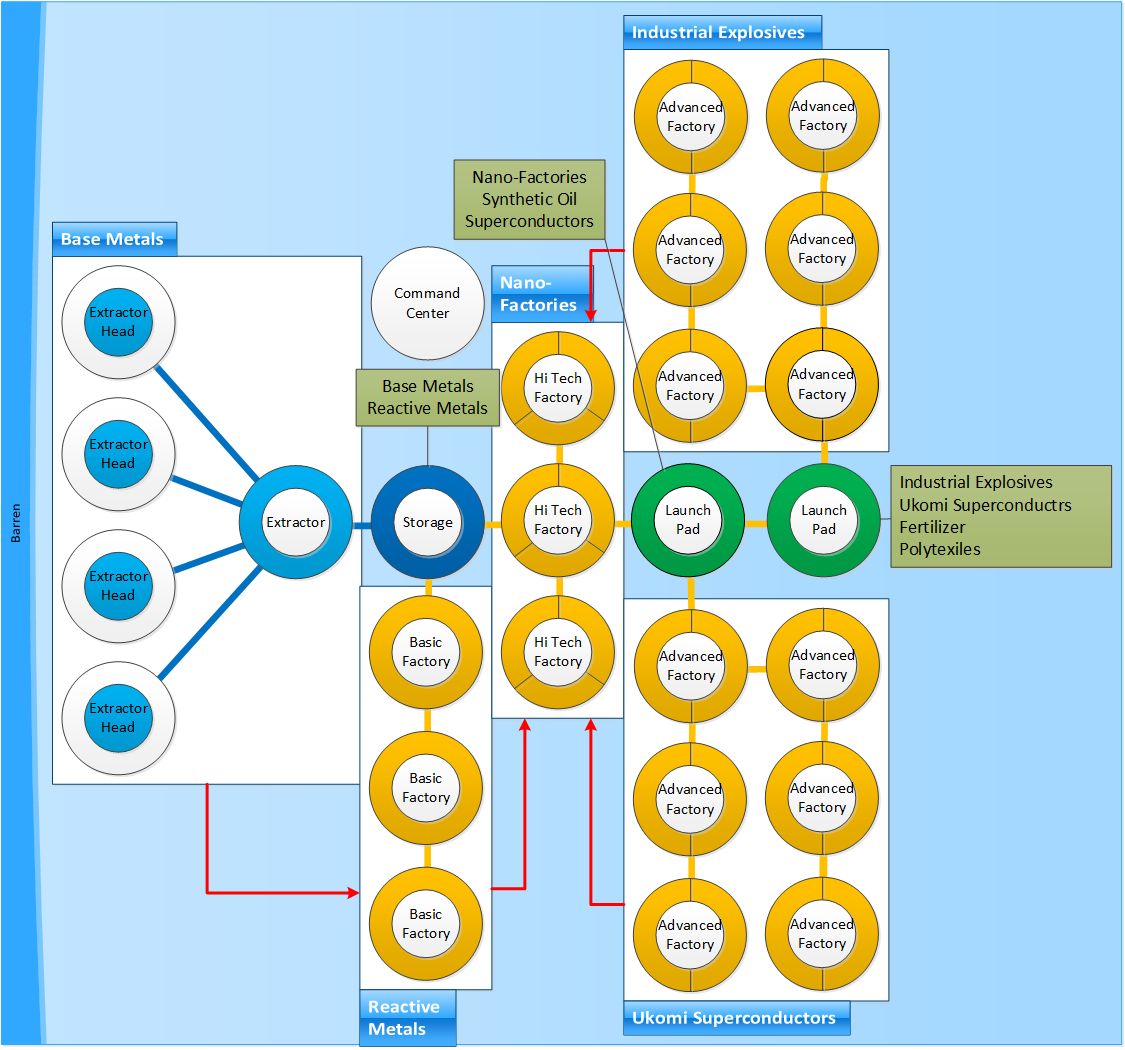
Select the best location on the planet, the highest concentration of the base resource "Base Metals"
For this please use the P2 planets placement strategy as a guide. However now you only need to make sure you get the best spot for just one resource.Setup your extractor with it's own extraction buffer
Just like the P2 planets four extractor heads is the sweetspot. Please see the P2 planets for the details.Place your three Basic factories, two launch pads, twelve Advanced factories and three high tech factories
Now place the following structures according to the scheme:- three Basic Factories
- two Launch Pads
- twelve Advance Factories
- three Hi Tech Factories
Setup your three Basic factories
The Basic Factories should get their Base Metals from the buffer. The resulting Reactive Metals should be fed back to the buffer.Setup your twelve advanced factories
For the Advanced Factories we make 2 sets of 6 Factories (see the scheme for a detailed overview):- The first set will be making Industrial Explosives which will be routed to the second Landing Pad. The Materials required for production are routed from the second Launch Pad to the six factories.
- The set set will be making Ukomi Superconductors which will be routed to the second Landing Pad. The Materials required for production are routed from the first Launch Pad to the six factories.
Setup your three hi tech factories
The High Tech Factories will be producing Nano-Factories which will be routed to the first Launch Pad. The following products need to be routed to these factories:- Base Metals from the buffer
- Industrial Explosives from the second Launch pad
- Ukomi Superconductors from the second Launch Pad
Do not forget to submit!
Congratulations your P4 planets is done and producing. Supply it with P2 products it will fill up around 4 days. [TODO] Add how to stertch this